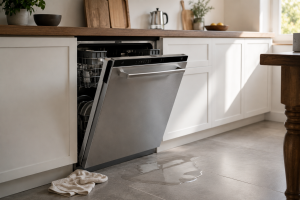
Why Dishwasher Leaks Need Fast Attention
A dishwasher leak can look small at first. A few spoonfuls of water at the front edge may not seem urgent, especially if the dishwasher finishes the cycle and the dishes look clean. The problem is that water often travels before it becomes visible. It can run under the toe kick, seep below flooring, soak cabinet side panels, or hide behind the dishwasher where homeowners cannot easily see it.
Dishwasher leaks also happen at different points in the cycle. A leak during fill can point toward water level, inlet valve, float, or supply-line problems. A leak during wash may point toward the door gasket, spray arm, detergent, leveling, or pump area. A leak during drain may involve the drain hose, air gap, disposal connection, pump housing, or check valve. Knowing when the water appears is often just as important as where it appears.
This guide helps homeowners perform safe checks before calling for dishwasher repair. It is not a guide to taking the dishwasher apart. It is a practical way to protect the kitchen, narrow the source, and know when a professional diagnosis is the better move.
How a Dishwasher Leak Usually Starts
A dishwasher is designed to hold water inside a tub while spray arms move water forcefully over dishes. The appliance fills to a controlled level, circulates water through the sump and pump system, drains through a hose, and seals at the door with a gasket. A problem in any part of that system can create a visible leak.
The most common leak paths include:
- Door gasket soiled, flattened, torn, or not sealing.
- Dish rack or utensil blocking the door from closing.
- Dishwasher detergent replaced by dish soap or handwashing liquid.
- Too much detergent or rinse aid spill causing excess suds.
- Dishwasher tilted forward or side-to-side.
- Spray arm blocked, cracked, clogged, or aimed toward the door.
- Float stuck down, allowing too much water into the tub.
- Water supply hose loose, cracked, or damaged.
- Drain hose loose, split, kinked, or leaking at a clamp.
- Air gap or disposal connection sending water backward.
- Pump, sump, motor shaft, or diverter seal leaking underneath.
- Tub cracked from age, impact, installation stress, or corrosion.
Manufacturer guidance from Whirlpool, LG, GE Appliances, and Samsung consistently points homeowners toward gasket condition, detergent type, leveling, hose connections, spray-arm blockage, water-level control, and professional service when water appears beneath the dishwasher.
Step-by-Step Troubleshooting
1. Stop the Cycle and Dry the Area
If water is actively leaking, pause or cancel the cycle. Dry the floor and place a towel along the front edge. If water is spreading under cabinets, stop using the dishwasher until the source is identified.
Safe homeowner action: Take a photo of the puddle before wiping it up. Note whether the leak appeared during fill, wash, rinse, or drain.
Call for service if: Water keeps coming from under the dishwasher, the leak reaches electrical outlets, or flooring is beginning to swell.
2. Confirm It Is a Leak, Not a Spill
Water near a dishwasher can come from handwashing dishes, a sink leak, a disposal connection, a wet cutting board, a pet bowl, or a spill from unloading cups. Start with a clean, dry floor so the next water pattern is easier to read.
Safe homeowner action: Dry the floor completely, run a short supervised cycle, and watch where the first water appears.
Call for service if: The first water appears from under the dishwasher or behind the lower kick plate.
3. Check for the Wrong Detergent
Dishwashers require automatic dishwasher detergent. Dish soap, hand soap, laundry detergent, and some cleaning products can create heavy suds that push out around the door. Oversudsing can look like a gasket leak even when the gasket is fine.
Safe homeowner action: Open the door carefully and look for foam. Use only dishwasher detergent, and do not overfill the dispenser.
Do not do this: Do not add dish soap to a dishwasher. If you already did, stop the machine and clean up before running more cycles.
4. Inspect the Door Gasket
The door gasket is the flexible seal around the tub or door opening. Food residue, grease, glass chips, hardened detergent, or a flattened section can prevent a tight seal. A tear or missing section usually requires replacement.
Safe homeowner action: With the dishwasher off and cool, wipe the gasket with mild soap and a soft cloth. Check corners closely. Make sure no utensil, pan handle, or rack item is preventing the door from closing.
Call for service if: The gasket is torn, loose, hardened, distorted, or water still leaks from the door after cleaning.
5. Check Whether the Door Hits the Cabinet
A dishwasher can latch even when it is not sealing correctly. If the control panel, door edge, or side of the dishwasher touches the cabinet, counter, or adjacent trim, the door may not close squarely. GE and Samsung guidance both note that installation or cabinet interference can contribute to door leaks.
Safe homeowner action: Open and close the door slowly. Look for rubbing, twisting, or uneven gaps.
Call for service if: The dishwasher needs to be repositioned, the cabinet opening is tight, or the tub appears distorted.
6. Confirm the Dishwasher Is Level
An unlevel dishwasher can send water toward the door, cause one corner to leak, or keep the door from sealing properly. LG and Samsung both emphasize leveling as a common leak check.
Safe homeowner action: Place a small level inside the tub or on a flat rack surface if the manual allows. Look for obvious forward tilt or side-to-side tilt.
Call for service if: Leveling feet are stuck, the dishwasher is secured tightly to cabinetry, the floor is uneven, or the unit is built into a tight opening.
7. Look for Spray Arm Problems
Spray arms should spin freely and spray water through small openings. If a spray arm is blocked by a tall utensil, clogged with food, cracked at a seam, or split along the side, water may hit the door seal with unusual force and leak out.
Safe homeowner action: Spin the spray arms by hand with the dishwasher off. Remove visible food particles from spray holes. Make sure large dishes do not block arm movement.
Call for service if: A spray arm is cracked, loose, not rotating, or water still leaks after loading is corrected.
8. Clean the Filter and Sump Area
A clogged filter or debris in the sump area can affect water movement and drainage. On some models, debris can also interfere with the float or redirect spray.
Safe homeowner action: Remove and rinse the dishwasher filter only according to the owner manual. Check for bones, labels, glass, seeds, or food pieces in accessible areas.
Do not do this: Do not reach blindly into the sump. Broken glass and sharp debris can hide there.
9. Check the Float
The float helps control water level in many dishwashers. If it is stuck down by food debris, a cap, a label, or mineral buildup, the dishwasher may overfill. Overfilling can create leaks from the door or underneath.
Safe homeowner action: If the float is visible in the tub, gently lift it up and down. It should move freely. Wipe around it if food debris is present.
Call for service if: The float is stuck, damaged, missing, or the dishwasher seems to overfill.
10. Inspect Under-Sink Hose Connections
Some dishwasher leaks start under the sink, not at the dishwasher. The drain hose may connect to an air gap, disposal, or sink drain. A loose clamp, clogged air gap, or disposal connection problem can create water during drain.
Safe homeowner action: Look under the sink with a flashlight while the dishwasher drains. Do not put your hand near moving disposal parts.
Call for service if: Water drips from the hose, air gap, disposal connection, or wall plumbing.
11. Watch for Water Behind the Toe Kick
Water behind or below the lower front panel usually means the source is not a simple door drip. It may involve the inlet valve, pump seal, diverter seal, sump, drain pump, hose connection, or tub.
Safe homeowner action: Do not remove electrical panels unless your manual clearly allows access and power is off. Dry the floor and stop using the dishwasher.
Call for service if: Water appears from underneath or behind the toe kick. This is the point where professional diagnosis is usually needed.
12. Shut Off Water and Power When Needed
If the leak is active, do not keep testing long cycles. Dishwashers are connected to water and electricity, and water can travel under flooring or into cabinetry.
Safety note: If water is near electrical wiring, outlets, the dishwasher power connection, or the control area, stop. Turn off power at the breaker if it is safe and clearly labeled. Shut off the dishwasher water supply if you can reach it safely. Call for help if the leak is more than a small controlled drip.
Brand-Specific Considerations
Whirlpool and Maytag dishwashers often direct homeowners to check the door gasket, float, inlet valve, hose connections, pump or motor seals, leveling, filter, drain path, detergent, and loading. Whirlpool guidance also recommends service for cracked tubs, persistent overfill, pump-area leaks, or leaks that continue after basic checks.
LG dishwashers commonly emphasize installation, leveling, gasket buildup, door seal damage, detergent, and maintenance. If the door seal is torn or the dishwasher cannot be leveled correctly, LG guidance points toward service.
GE dishwashers often connect door leaks with new-gasket seating, cabinet interference, gasket condition, lower corner pieces, spray arm holes, inlet hose, and drain hose condition. GE notes that holes, splits, or blocked spray-arm openings can redirect water toward the door.
Samsung dishwashers recommend confirming the water is truly a leak, turning off power when appropriate, inspecting the supply hose, using dishwasher detergent only, leveling the dishwasher, checking for tub distortion from over-tightened cabinet screws, and cleaning water nozzles.
Bosch, KitchenAid, Miele, Thermador, Fisher & Paykel, and panel-ready models may have model-specific door seals, leak sensors, trays, drawer designs, or cabinet access limitations. Follow the owner manual before removing panels or attempting installation adjustments.
For professional help with major dishwasher brands, Universal Appliance Repair supports Whirlpool appliance repair, LG appliance repair, GE appliance repair, and Samsung appliance repair.
Repair vs. Replace Guidance
Repair is usually worth considering when: The dishwasher is under 8 to 10 years old, cleans well, has a leak from a gasket, hose, inlet valve, float, drain pump, sump seal, diverter seal, spray arm, or installation issue, and the cabinet and tub are in good condition.
Replacement may make more sense when: The dishwasher is older than 10 to 12 years, has a cracked tub, repeated pump and motor leaks, major rust, damaged racks plus a leak, unavailable parts, or water damage that makes reinstallation risky.
Do not replace before checking: Wrong detergent, oversudsing, door gasket buildup, loading problems, spray-arm blockage, leveling, visible hose connections, and filter debris. Many dishwasher leaks are repairable once the true source is found.
For broader diagnosis, Universal Appliance Repair provides full appliance repair service for kitchens and laundry rooms.
Appliance Lifespan Guide
Dishwasher: 8 to 12 years. Clean filters, protect door seals, and address leaks early.
Refrigerator: 10 to 15 years. Maintain door seals and address water leaks quickly.
Freezer: 10 to 20 years. Keep vents clear and watch for frost or drain problems.
Washing machine: 8 to 12 years. Inspect hoses and avoid overloading.
Dryer: 10 to 13 years. Clean lint and maintain vent airflow.
Range or oven: 10 to 15 years. Keep burners, igniters, and controls clean.
Maintenance Checklist
- Use only automatic dishwasher detergent.
- Do not add dish soap to the dishwasher.
- Wipe the door gasket regularly.
- Keep utensils and large pans from blocking the door.
- Load dishes so spray arms can spin freely.
- Clean the dishwasher filter according to the owner manual.
- Check visible spray-arm holes for food or mineral buildup.
- Avoid forcing racks closed.
- Look under the sink for hose moisture after drain cycles.
- Watch for water at the front corners after new installation.
- Address small leaks before cabinet or flooring damage spreads.
Safety Section
Dishwasher leaks combine water, electricity, cabinetry, and hidden plumbing. A slow drip can become a floor repair if it is ignored.
Stop using the dishwasher and call for help if you notice:
- Water from underneath the dishwasher.
- Water behind the toe kick.
- Leak near the power connection or outlet.
- Breaker tripping.
- Burning smell, buzzing, or electrical odor.
- Swollen cabinet panels or flooring.
- Repeated overfill.
- Sudden large leak during fill or drain.
- Leak after a gasket, detergent, and loading check.
Do not attempt: Do not remove electrical covers while power is on, reach blindly into the sump, keep running cycles to “test” an active leak, use towels as a permanent solution, bypass float switches, or ignore water that reaches cabinetry.
Why Choose Universal Appliance Repair
Dishwasher leaks are often misread. A door leak may come from oversudsing, but it may also come from a warped gasket, poor leveling, spray-arm damage, or cabinet interference. Water under the unit may look like a drain issue but actually come from an inlet valve, pump seal, diverter, sump, or supply line.
Universal Appliance Repair diagnoses the full leak path: door seal, water level, detergent behavior, spray pattern, float operation, drain routing, hose connections, pump area, installation, and brand-specific design. That matters because a leak repair should stop the source, not just dry the floor.
When a dishwasher keeps leaking after basic checks, professional diagnosis can protect cabinets, flooring, and the appliance itself.
Key Takeaways
- The first place water appears is the most important clue.
- Front-edge leaks often involve gasket, detergent, loading, leveling, or spray-arm issues.
- Water underneath the dishwasher usually needs professional diagnosis.
- Wrong detergent or excess suds can make a good dishwasher leak.
- A stuck float or inlet valve can cause overfill.
- Stop testing if water reaches electrical areas, cabinetry, or flooring.
Author Information
The Universal Appliance Repair Certified Expert Team consists of experienced appliance repair professionals with more than 25 years of combined hands-on experience servicing residential appliances. Articles are reviewed using manufacturer guidance, current industry best practices, and practical field experience.