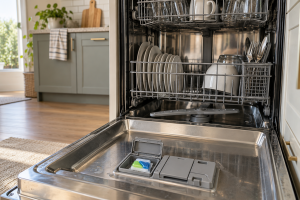
Where the Pod Lands Tells You What Failed
The detergent dispenser is timed to open after water has entered the machine. A pod needs moving wash water, sufficient cycle time, and a clear path out of the cup. Seeing a pod at the end is therefore a clue about the sequence, not proof that the pod brand is defective.
Bosch’s owner guidance specifically lists a lid blocked by dishes or by a tablet placed upright, spray arms blocked by dishes, a damp dispenser, old detergent, and quick cycles that give tablets too little time to dissolve. Whirlpool also directs owners to check whether water supply and dispenser access are adequate.
The important distinction is between a dry, unopened cup and an open cup coated with residue. The first points toward loading or dispenser release. The second points toward detergent condition or wash-water delivery. A machine that never fills cannot dissolve even a fresh pod.
For local help, Universal Appliance Repair can diagnose the appliance safely and explain whether repair is practical before parts are replaced. Start with the related service page when the problem points beyond basic homeowner checks: Dishwasher repair, Dishwasher not filling with water.
Step-by-Step Troubleshooting
1. Check whether the cycle actually finished
A paused or interrupted cycle may not reach the detergent-release stage. Read the display and any error code before restarting. If the door was opened, use the model’s Resume procedure.
2. Look at the dispenser before removing the pod
Is the lid closed, partly open, or fully open? Is the cup dry or wet? Photograph this state. These details narrow the cause better than another random cycle.
3. Clear the lid’s swing path
A tall baking sheet, pan handle, cutting board, or utensil basket can stop the lid from opening. With the machine off, close the empty lid by hand and verify that it can spring open without touching dishes.
4. Load a fresh pod into a dry cup
Moisture can make the soluble film stick before the wash begins. Keep pods dry in their original container and handle them with dry hands. Follow the detergent and dishwasher instructions; do not puncture the film.
5. Choose a full wash cycle
A short or quick program may not give a tablet enough time to dissolve. Try the normal cycle recommended by the manufacturer for a standard load. If using a very short cycle, use the detergent type specified in the manual.
6. Make sure the machine fills
Listen for water after the initial drain and look for normal wash sounds. Confirm the under-sink supply valve is open. Do not open the toe kick or disconnect the supply line to test the inlet valve.
7. Check spray-arm movement
Before the cycle, rotate each accessible arm by hand. A utensil, pot, or lowered rack can block it. Clean removable arms only as the manual directs; do not enlarge spray holes with metal picks.
8. Clean the filter and surrounding well
A packed filter can reduce circulation and leave food in the tub. Remove and rinse the user-serviceable filter following the manual, then seat it fully. Use care around broken glass.
9. Watch for heat and rinse clues
If the pod partly dissolves and dishes remain greasy or cold, note the program and whether hot water reaches the kitchen tap. Do not raise the water-heater temperature beyond safe household guidance or open electrical panels.
10. Call if the same pattern repeats
A technician can test the dispenser actuator, water inlet, wash pump, spray pressure, heater, and control timing. A lid that repeatedly stays closed with clear loading or a dry tub after a full cycle needs diagnosis.
Brand-Specific Considerations
Bosch: Some manuals specify placing a tablet flat and keeping the tablet tray and dispenser swing path clear. A quick program can leave residue.
Whirlpool, Maytag, and KitchenAid: The dispenser must have space to open, and a fully open water supply is necessary for washing and dissolving detergent.
GE: Bottle jets, third racks, and adjustable rack positions change what may block a dispenser or spray arm. Recheck clearance after changing rack height.
LG and Samsung: Auto-open, express, and smart cycles differ by model. Save any water-supply or wash-motor code before power is reset.
Miele: Automatic detergent dosing and conventional detergent cups are different systems. Use the exact program and detergent specified for the model.
Brand design matters because the same symptom can come from different parts depending on the model. A traditional mechanical appliance may fail in a visible, direct way. A newer electronic model may pause, lock out, show a code, or keep the display normal while a sensor or control input prevents normal operation. Keep the model number handy before scheduling service.
Repair vs. Replace Guidance
A blocked lid, damp cup, old pod, or wrong cycle calls for an adjustment, not an appliance replacement. A failed dispenser or inlet valve is generally worth repairing on an otherwise sound dishwasher. Replacement becomes a reasonable comparison for an older unit with a costly wash-pump or control fault plus rack corrosion, tub leaks, or unavailable parts. The estimate should name the failed part and include whether water circulation was verified.
As a practical rule, compare the repair estimate with the appliance age, part availability, cosmetic condition, and how central the appliance is to the household. A modest repair on a well-kept midlife appliance often makes sense. A major sealed-system, transmission, cabinet, or control repair on an appliance near the end of its expected life deserves a replacement conversation.
Appliance Lifespan Table
Refrigerator: 10-15 years. Maintenance priority: clean coils, protect door seals, and keep temperatures steady.
Freezer: 10-20 years. Maintenance priority: keep vents clear, check gasket contact, and defrost models that require manual defrosting.
Dishwasher: 8-12 years. Maintenance priority: clean the filter, inspect spray arms, and avoid blocked drain paths.
Washing machine: 8-12 years. Maintenance priority: avoid overloading, use the right detergent amount, and inspect hoses.
Dryer: 10-13 years. Maintenance priority: clean the lint filter, vent path, and exterior termination.
Range or oven: 10-15 years. Maintenance priority: keep burners, igniters, caps, racks, and controls clean.
Maintenance Checklist
- Keep detergent sealed and dry, and load a pod only into a dry dispenser cup.
- Leave clearance in front of the dispenser lid and around spray arms.
- Clean and reseat the user-serviceable filter on the manual’s schedule.
- Check that rack-height changes do not cause dishes to block an arm.
- Use the detergent and cycle combination recommended for the model.
Safety Section
Stop if the dishwasher leaks, smells hot, or trips a breaker. Never reach into a running machine, force a dispenser latch, or remove the toe kick to investigate live electrical parts. Unplug or switch off power before any owner-approved cleaning that requires access beyond the tub.
Handle detergent pods with dry hands and keep them away from children. Follow the product label and do not puncture the film.
What to Tell the Technician
Photograph the dispenser before removing the leftover pod. Report whether its lid was closed or open, whether the cup was dry or wet, the cycle used, and whether the machine filled and sprayed. Share any error code and the result of checking loading clearance and the accessible filter.
Key Takeaways
- A closed dispenser suggests a release or loading problem; an open cup with residue points toward detergent or wash-water delivery.
- A damp cup, old pod, or very short cycle can leave detergent behind without a failed part.
- Verify fill and spray-arm clearance before blaming the dispenser.
- Repeated failure after a full cycle calls for diagnosis, not a series of replacement pods.
Homeowner Actionability Score
25/25. The article uses the pod’s final location and the lid’s position to guide a sequence of safe checks. It gives a clear stop point for repeated dispenser failure, inadequate fill, heat issues, and electrical or pump access.
Editorial Standard
This article was technically reviewed for homeowner safety, practical troubleshooting value, answer-engine clarity, link accuracy, and current appliance repair practices. Recommendations follow manufacturer guidance, public safety sources, and the Universal Appliance Repair Knowledge Base v6.0.
Sources and Further Reading
Author Information
The Universal Appliance Repair Certified Expert Team consists of experienced appliance repair professionals with more than 25 years of combined hands-on experience servicing residential appliances. Articles are reviewed using manufacturer guidance, current industry best practices, and practical field experience.