Start at the Tap, Then Watch What the Washer Actually Does
The washer does not simply open a tap and fill to the top. Its control first confirms that the door or lid is safe, then asks one or more inlet valves to admit water while a pressure sensor tracks the level. A supply restriction can look like a failed valve; a drain hose that siphons can make a working inlet appear too slow.
Many high-efficiency machines add water in stages and move the load during sensing. Clothes may not sit under a deep pool. Whirlpool’s guidance distinguishes normal low-water operation from a true long-fill condition and asks owners to check both household supplies, hose kinks, and drain installation before suspecting internal parts.
A washer that fills only on one temperature is especially useful evidence. It can point toward one supply line or inlet path. A machine that gives the same low-flow code on every temperature raises a broader supply, pressure, valve, or control question. Observe the pattern; do not disconnect a pressurized hose beside an electrical outlet.
For local help, Universal Appliance Repair can diagnose the appliance safely and explain whether repair is practical before parts are replaced. Start with the related service page when the problem points beyond basic homeowner checks: Washer repair, Washer won’t start.
Step-by-Step Troubleshooting
1. Confirm that a cycle is truly running
Clear Control Lock, select a wash cycle, close the door or lid firmly, and press Start as the model requires. Photograph any code before clearing it. If the display remains dark, use the separate no-start troubleshooting path.
2. Give load sensing its normal time
Some high-efficiency top loaders make short movements and pauses before adding more water. Watch one complete start sequence against the owner’s manual. Do not add water manually just because the clothes are not submerged.
3. Open both household supply valves
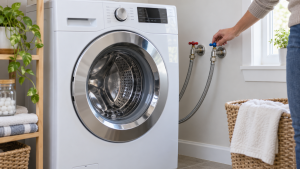
Look at the hot and cold valves behind or beside the machine. Make sure both are fully open and that no recent plumbing work left one closed. If a valve is corroded, leaks, or resists normal movement, stop and call a plumber.
4. Inspect only the visible hose runs
A machine pushed tight against the wall can pinch a fill hose. Check the accessible hose curve without pulling the washer across the floor or straining connections. Replace a bulging, cracked, or leaking hose rather than trying another cycle.
5. Compare hot and cold symptoms
Try the model’s permitted warm and cold selections once, with an empty or light load. If one selection fills and the other does not, tell the technician. Do not keep running cycles that produce a low-flow error.
6. Check whether water is draining as it enters
Listen for continuous drain sound and look at the visible drain hose. A hose pushed too far down a standpipe or installed below the specified height can siphon. Follow the model’s installation guide; do not seal the standpipe airtight.
7. Look for an anti-flood hose or recent filter change
Some external flood-stop devices close after a pressure event or are incompatible with a washer’s fill pattern. A whole-house filter or pressure change can also slow flow. Ask the installer or plumber to assess the supply; do not bypass a protective device blindly.
8. Use one safe reset if the manual allows it
When there is no leak, hot electrical smell, or repeated breaker trip, cancel the cycle and perform the manufacturer’s power reset. If the washer fills once and then fails again, the intermittent fault still needs diagnosis.
9. Stop for leaks or electrical warning signs
Close both water valves if there is a leak. Do not touch a wet receptacle, damaged cord, or flooded floor near power. Leave a repeatedly tripping circuit off and call for service.
10. Have the inlet path tested
A technician can check actual supply pressure, inlet screens and valve coils, door or lid signal, pressure sensing, wiring, and control commands. These checks distinguish a household plumbing restriction from a component fault without guessing at parts.
Brand-Specific Considerations
Whirlpool and Maytag: Long-fill and low-flow codes often call for checking both supplies, hose kinks, and the drain-hose installation. Some cold selections still draw from both lines.
LG and Samsung: Automatic sensing and electronic water-level control can make the first minute look quiet. Preserve the exact display code and model number.
GE: Deep Fill and other cycle choices change the visible water level. Compare the actual cycle behavior with the manual before treating a low level as a fault.
Speed Queen: Mechanical and electronic platforms have different fill behavior and fault reporting. A machine that only fills on one temperature still provides a useful supply clue.
Bosch and compact models: One-hose or compact installations may have different supply requirements. Read the model’s installation instructions before applying a two-hose rule.
Brand design matters because the same symptom can come from different parts depending on the model. A traditional mechanical appliance may fail in a visible, direct way. A newer electronic model may pause, lock out, show a code, or keep the display normal while a sensor or control input prevents normal operation. Keep the model number handy before scheduling service.
Repair vs. Replace Guidance
Repair usually makes sense when a washer in otherwise good condition needs an inlet valve, door switch, pressure sensor, or accessible supply correction. Replacement deserves consideration when an older machine also has bearing noise, tub damage, recurring leaks, or multiple expensive control and drive failures. The estimate should distinguish household plumbing work from appliance work; a closed tap or kinked hose is not a reason to replace the washer.
As a practical rule, compare the repair estimate with the appliance age, part availability, cosmetic condition, and how central the appliance is to the household. A modest repair on a well-kept midlife appliance often makes sense. A major sealed-system, transmission, cabinet, or control repair on an appliance near the end of its expected life deserves a replacement conversation.
Appliance Lifespan Table
Refrigerator: 10-15 years. Maintenance priority: clean coils, protect door seals, and keep temperatures steady.
Freezer: 10-20 years. Maintenance priority: keep vents clear, check gasket contact, and defrost models that require manual defrosting.
Dishwasher: 8-12 years. Maintenance priority: clean the filter, inspect spray arms, and avoid blocked drain paths.
Washing machine: 8-12 years. Maintenance priority: avoid overloading, use the right detergent amount, and inspect hoses.
Dryer: 10-13 years. Maintenance priority: clean the lint filter, vent path, and exterior termination.
Range or oven: 10-15 years. Maintenance priority: keep burners, igniters, caps, racks, and controls clean.
Maintenance Checklist
- Inspect exposed fill hoses for bulges, cracks, sharp bends, and damp connections.
- Keep both supply valves accessible and make sure they turn without forcing them.
- Follow the manual’s drain-hose height and standpipe-depth limits.
- Use the recommended load size so sensing and fill behavior are easier to assess.
- Photograph any recurring fill code before resetting the washer.
Safety Section
If a hose leaks, close the household supply valves and avoid wet outlets or cords. Do not disconnect a pressurized hose for a flow test, move a heavy washer across a wet floor, or reach behind it while it is running. A breaker that trips again, a burning smell, or water near electrical parts ends homeowner troubleshooting.
A slow fill does not justify bypassing a lid or door lock. Leave inlet-valve, pressure-sensor, and live electrical checks to a qualified technician.
What to Tell the Technician
Give the model number and note whether the problem affects hot, cold, or both selections. Say whether water never enters, enters slowly, or enters and immediately drains. Include any long-fill code, recent hose or plumbing work, and whether the taps and visible hose runs were checked. A short video of the first fill attempt can help.
Key Takeaways
- A washer that pauses to sense a load may be operating normally; a dry drum after the expected fill stage is different.
- Check both household taps and visible hose runs before suspecting the inlet valve.
- Water that enters then disappears may point to drain-hose siphoning.
- Stop for leaks, wet electrical areas, or a breaker trip; internal tests need a technician.
Homeowner Actionability Score
25/25. The reader can separate normal sensing from a true no-fill event, check taps and visible hoses, recognize siphoning, and document temperature-specific behavior. Leaks, corroded valves, wet electrical areas, and internal valve testing have clear stop points.
Editorial Standard
This article was technically reviewed for homeowner safety, practical troubleshooting value, answer-engine clarity, link accuracy, and current appliance repair practices. Recommendations follow manufacturer guidance, public safety sources, and the Universal Appliance Repair Knowledge Base v6.0.
Sources and Further Reading
Author Information
The Universal Appliance Repair Certified Expert Team consists of experienced appliance repair professionals with more than 25 years of combined hands-on experience servicing residential appliances. Articles are reviewed using manufacturer guidance, current industry best practices, and practical field experience.