Introduction
A leaking garbage disposal can be messy, but the bigger concern is where the water is going. Water under a sink can damage cabinet flooring, create odors, loosen particleboard, attract pests, and reach electrical connections. A small drip can also point to a failing seal, cracked disposal body, loose flange, bad drain gasket, dishwasher drain issue, or plumbing backup.
This guide explains how to locate the source safely, which leaks may be simple, and when to schedule garbage disposal repair before the cabinet damage spreads.
Why This Happens
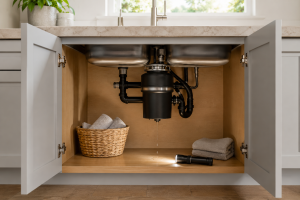
A garbage disposal mounts below the sink with a flange, mounting ring, seals, discharge pipe, and sometimes a dishwasher drain hose. Water passes through the disposal chamber and exits through the side drain connection into the trap. If any seal, gasket, hose, clamp, pipe, or housing fails, water can drip into the cabinet.
Common causes include loose mounting hardware, failed plumber’s putty, worn flange gasket, misaligned discharge pipe, loose dishwasher hose clamp, cracked dishwasher drain hose, clogged drain line, loose trap nut, cracked disposal chamber, rusted internal seal, failed bottom seal, vibration damage, or over-tightened plastic drain parts.
Step-by-Step Troubleshooting
1. Turn Off the Disposal
Stop using the disposal as soon as you notice water. Do not keep testing it with large amounts of water. If water is near the cord, outlet, switch module, or wiring, avoid touching those areas and stop troubleshooting.
2. Dry the Cabinet Floor
Use towels to dry the cabinet base and disposal exterior. A dry surface makes it easier to see the first drip. Place a bowl or towel under the suspected area, but do not position your hand near the bottom while the unit is running.
3. Look for the Highest Wet Point
Water follows gravity, so the drip on the cabinet floor may not be the source. Start at the sink flange, then check the mounting ring, dishwasher hose, side discharge pipe, trap connection, reset button area, and bottom of the unit.
4. Test With a Small Amount of Water
If the area is dry and no electrical parts are wet, run a small stream of water into the sink without turning on the disposal. Watch with a flashlight. If water appears before the motor runs, the leak is likely from a seal, flange, drain pipe, trap, or dishwasher inlet.
5. Check the Sink Flange
A leak from the top often means the sink flange seal has failed or the mounting assembly loosened. Water may appear around the top of the disposal, then travel down the body. Fixing this usually requires removing or loosening the disposal, resealing the flange, and remounting the unit.
6. Inspect the Side Discharge Pipe
The side pipe carries water from the disposal to the drain trap. A loose screw, worn gasket, cracked elbow, or misaligned pipe can leak whenever the sink drains. Avoid over-tightening plastic parts because they can crack.
7. Check the Dishwasher Connection
If the dishwasher drains through the disposal, inspect the hose and clamp where it connects to the disposal inlet. A loose clamp or cracked hose can leak during dishwasher drain cycles. If the leak appears after the dishwasher runs, see dishwasher repair as well as disposal service.
8. Identify Bottom Leaks
A leak from the reset button, motor housing, or bottom of the disposal often means water is passing through the internal chamber or lower seal. This is not usually solved by tightening plumbing. Continued use can let water reach electrical parts.
9. Listen for Related Mechanical Symptoms
If the disposal also hums, jams, vibrates, or trips the reset button, there may be more than one issue. Vibration can loosen pipes and worn seals can leak after the motor strains. For jam symptoms, compare with garbage disposal hums.
10. Check for Drain Backup
If water backs up into the sink or dishwasher, the disposal leak may be part of a clogged drain problem. Do not pour harsh drain chemicals into the disposal. Chemicals can damage seals, splash back, and create unsafe conditions for a technician.
11. Take Photos Before Moving Anything
Photos of the leak location, pipe routing, dishwasher hose, outlet, and mounting assembly help a technician understand what is happening. This is especially useful if the leak appears only during dishwasher drain or disposal operation.
Safety Tip
Never put your hand inside a garbage disposal. Water and electricity also require caution. OSHA’s food-service electrical safety guidance notes that electrical equipment near water should be properly grounded and kept free from recognized hazards: OSHA electrical safety guidance. If water is near an outlet, cord, switch, or power module, stop using the disposal.
When DIY Should Stop
DIY should stop when the leak comes from the bottom, the reset button area is wet, the outlet is wet, the disposal must be removed, drain pipes need disassembly, the dishwasher hose is cracked, or the mounting ring is loose. Professional appliance repair is safer when water, electricity, sharp parts, and plumbing connections overlap.
Repair vs. Replace Guidance
Repair usually makes sense: The disposal is newer and the leak appears to come from the sink flange, discharge gasket, trap connection, dishwasher hose clamp, or mounting assembly.
Get a diagnosis first: The disposal leaks only during dishwasher drain, vibrates heavily, hums, trips the reset button, drains slowly, or has several loose connections.
Replacement may be smarter: The disposal leaks from the bottom, has a cracked body, shows heavy rust, smells burned, has repeated jams, or is more than 8-12 years old.
Cost Expectations
Garbage disposal leak repair cost depends on the leak source, age, access, disposal size, mounting condition, drain layout, dishwasher connection, electrical setup, and whether the unit can be resealed or must be replaced. A loose discharge gasket is very different from a failed internal seal. Confirm the leak source before approving parts or replacement.
Appliance Lifespan Guide
Garbage disposal: 8-12 years. Priority: Avoid hard items, run cold water, and protect seals.
Dishwasher: 8-12 years. Priority: Clean the filter and inspect the drain hose.
Refrigerator: 10-15 years. Priority: Clean coils and protect door seals.
Washing machine: 8-12 years. Priority: Avoid overloading and check hoses.
Dryer: 10-13 years. Priority: Clean lint screen, duct, and venting.
Range or oven: 10-15 years. Priority: Keep burners, igniters, and controls clean.
Maintenance Checklist
- Run cold water before, during, and after disposal use.
- Avoid bones, shells, fruit pits, grease, pasta, rice, and fibrous scraps.
- Feed food waste gradually.
- Keep the under-sink cabinet dry.
- Check the dishwasher hose connection after leaks.
- Listen for new vibration.
- Stop use if the disposal hums or jams.
- Do not use harsh drain chemicals.
- Schedule service for bottom leaks, rust, repeated leaks, or electrical moisture.
Brand-Specific Considerations
InSinkErator: sink flange seals, mounting assemblies, discharge gaskets, dishwasher inlets, and older internal seals are common diagnostic areas.
Moen: mounting alignment, splash guards, discharge elbows, dishwasher hose connections, and body leaks should be checked carefully.
Waste King: EZ-mount components, side discharge parts, dishwasher knockout areas, and vibration-related leaks can overlap.
KitchenAid, Whirlpool, and GE disposals: flange seals, drain elbows, mounting hardware, and internal chamber condition may affect leak location.
Air-switch systems: if water is near a sink-top switch module, stop using the disposal. CPSC has reported disposal switch recalls where water intrusion created fire risk, which is a useful reminder to treat wet electrical parts seriously.
For related appliance issues, Universal Appliance Repair also services major brands such as Samsung appliance repair and LG appliance repair.
Why Choose Universal Appliance Repair
Universal Appliance Repair focuses on finding whether a disposal leak comes from the flange, mounting assembly, dishwasher hose, side drain, trap, internal seal, cracked body, or electrical area. A technician can identify the source, explain whether repair or replacement is practical, and protect the under-sink area. To get help, visit schedule service or check our service areas.
Key Takeaways
- A garbage disposal may leak from the sink flange, side discharge pipe, dishwasher hose, reset button area, bottom seal, cracked body, or surrounding drain plumbing.
- Homeowners can safely dry the area, look for the highest wet point, run a small water test, and photograph the leak.
- Stop DIY work if water is near electrical parts, the bottom leaks, pipes need removal, the dishwasher hose is cracked, or the mounting assembly is loose.
- Top and side leaks may be repairable, but bottom leaks often mean internal seal or body failure.
- Repair or replacement decisions depend on leak location, disposal age, rust, vibration, drain condition, and safety risk.
About the Author
Universal Appliance Repair Certified Expert Team
The Universal Appliance Repair Certified Expert Team includes appliance repair professionals with more than 25 years of combined residential service experience. Articles are reviewed using manufacturer guidance, current industry practices, and field experience.
Editorial Standard
This article was reviewed for homeowner safety, practical troubleshooting value, and current appliance repair practices. Recommendations are based on field experience, manufacturer guidance, safety sources, and industry best practices.
Homeowner Actionability Score
Total score: 25/25.
Problem clarity: 5/5. Explains top, side, dishwasher hose, drain, reset button, bottom seal, and cracked-body leak sources.
Safe homeowner checks: 5/5. Covers drying the cabinet, locating the highest wet point, small water testing, visible hose checks, and photo documentation.
DIY stop points: 5/5. Electrical moisture, bottom leaks, loose mounts, cracked hoses, drain disassembly, and sharp-part risks are clear.
Professional service guidance: 5/5. Explains when flange resealing, hose correction, drain repair, disposal removal, or replacement may be needed.
Confidence and next steps: 5/5. Homeowners get clear safety steps, repair thresholds, and service guidance.